

Hammerhead shark
INTRODUCTION
An ingenious wordplay can provide a substantial dose of humor and amusement. Pixelmator can be used to provide a graphical outcome for your own play on words. Follow this tutorial to create a literal interpretation of the hammerhead shark’s name.
The Clipping Masks, the Brush Tool, the Layer Masks and other features of Pixelmator are used in this tutorial.
RESOURCES
 PXM File
 Stock photo (Shark)
Stock photo (Hammer)
Notice: The stock photos used in this tutorial are not free for public use. To follow the steps in this tutorial either purchase them or try to find equivalent photographs of a shark and a hammer.
STEP 1
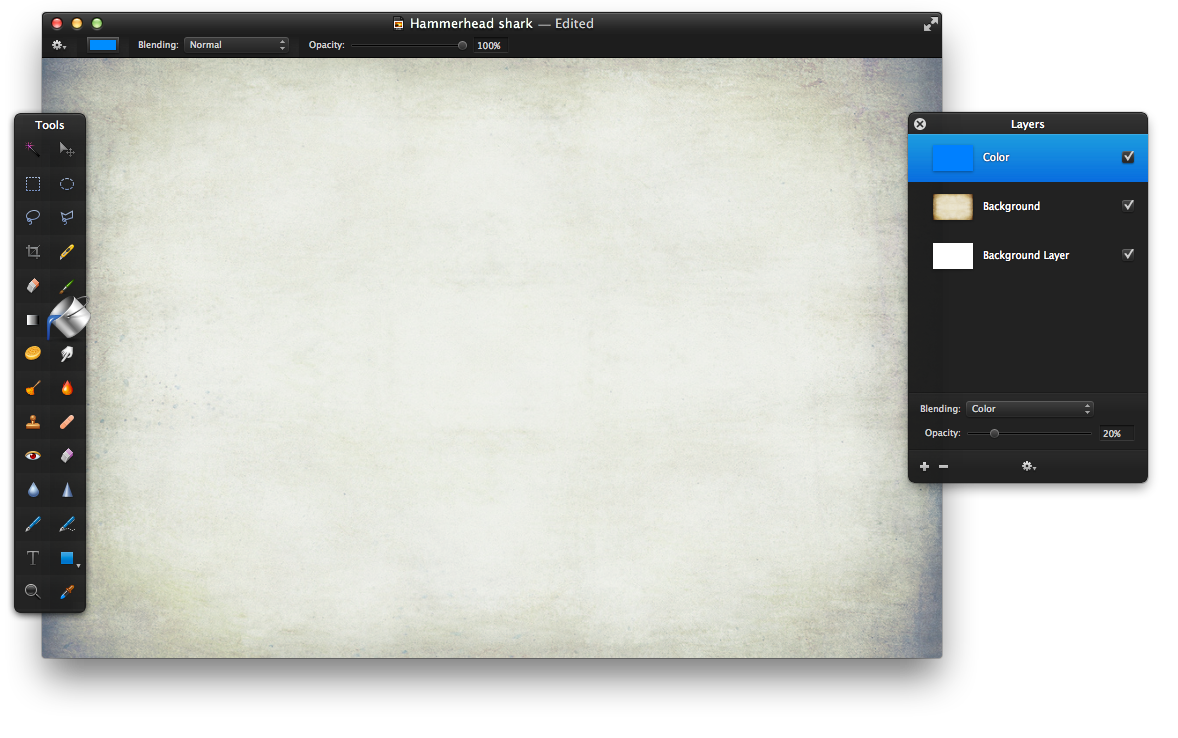
Open Pixelmator and create a new document. The image size used in this tutorial is 900×600 pixels. First, copy and paste the image of the grungy paper. Go to Edit>Transform and resize the image to roughly the same size as the canvas. Then, reduce it’s Opacity to 70%. After that, create a new layer and name it Color. Use the Paint Bucket Tool (N) to fill it with blue color (color code – #0080f) and set it’s Blending to Color and Opacity to 20%.
STEP 2
Now, lets add a vignette effect. Create a new layer named Vignette and fill it with black color using the Paint Bucket Tool (N). Then, use the Elliptical Marquee Tool (Y) to select the centre part of the layer. Use the image below as a reference. After that, go to Edit>Refine Selection, set the Feather to 70%, Size to 70px and click OK. Delete the selected part of the image by pressing the Delete key on your keyboard. Lastly, reduce the layer’s Opacity to 40%.

STEP 3
Lets start working on the shark! Copy and paste the image of the shark, flip it horizontally (Edit>Flip Horizontal) and resize it to about 26% of the original size (Edit>Transform). Also rotate the image until the shark’s body is parallel to the edges of the canvas.

STEP 4
Then, use the Polygonal Lasso Tool to select the outline of the shark. To remove any rough edges from your selection go to Edit>Refine Selection, set the Smooth to 10% and click OK. After that, copy and paste the selection into a new layer. The original image can now be deleted as it will not be used anymore. Lastly, let’s give the shark a matte finish. To do that go to Image>Shadows and Highlights, Lighten the Shadows by 50% and Darken Highlights by 100%.

STEP 5
Next, lets remove the bluish color on the shark’s belly. Create a new layer named White, right-click it and choose Create Clipping Mask. Then use a soft rounded brush to add strokes of white on the lower part of the shark. Use the image below as a reference. If you have trouble selecting an appropriate brush – consult the tip below. After that, set the layer’s Blending to Color.

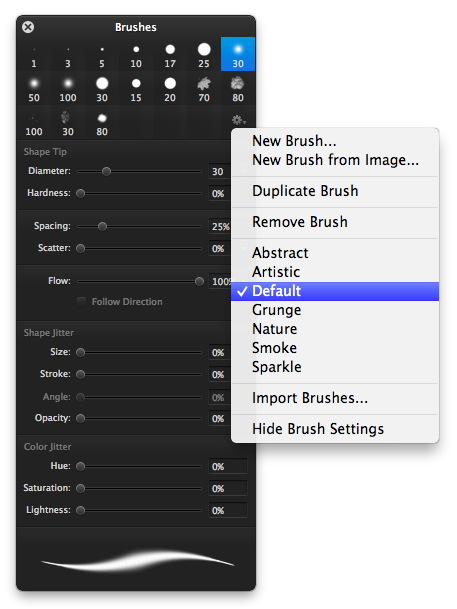
Tip: To select a brush that has soft and transparent edges open the Brushes Palette (Show>Show Brushes). Then, click the Action button in the palette and choose Default from the drop-down menu. Select the brush that is situated first from the right on the first row. Adjust the size of the brush by changing its Diameter and change the softness by reducing the Hardness of the brush.
STEP 6
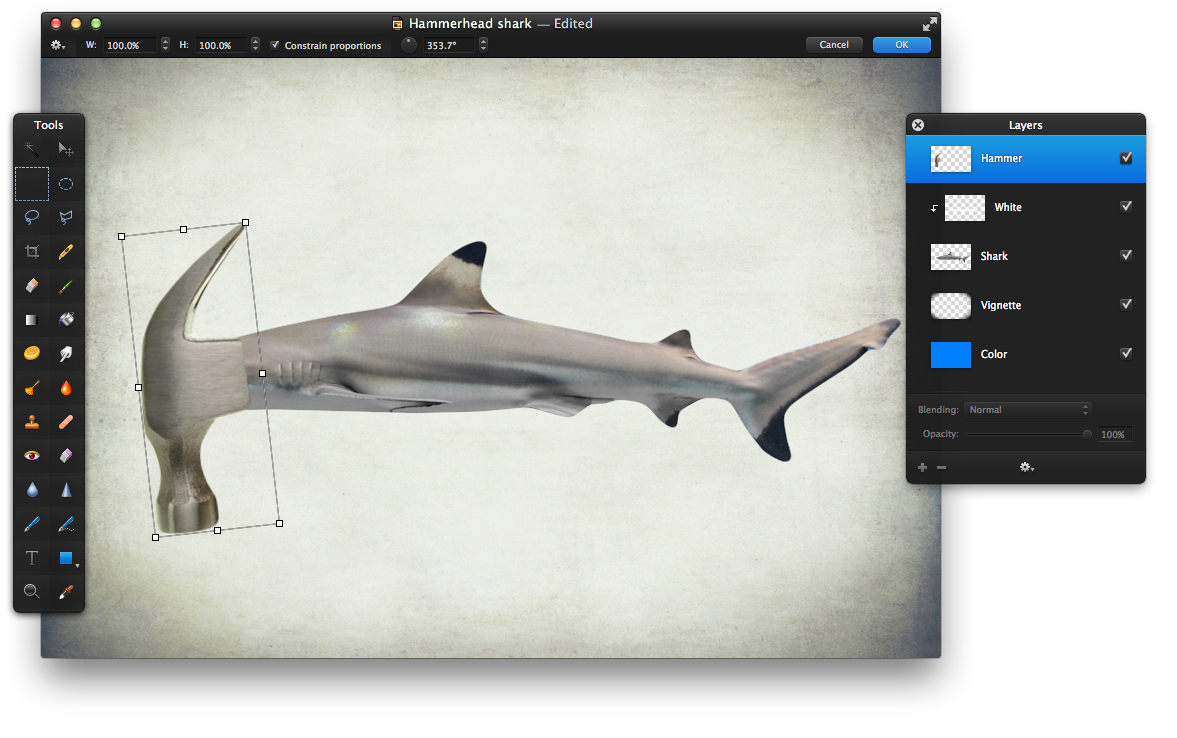
Now, copy and paste the image of the hammer. Rotate it 90° to the left (Edit>Rotate 90° left) and reduce the layer’s Opacity to 50%. This will make the image of the hammer see-through making it easier to position. After that, go to Edit>Transform and reduce the size of the image to about 23%. Use the Move Tool (V) to position the hammer as in the example below.

STEP 7
Next, use the Polygonal Lasso Tool to select the outline of the hammer’s head. To remove any sharp corners go to Edit>Refine Selection, set the Smooth to 10% and click OK. Then copy and paste the selection into a new layer. The original image can be deleted as it will not be used anymore. Lastly, rotate the hammer (Edit>Transform) so that it matches the curvature in the shark’s body.
STEP 8
Now, comes the interesting part. The image of the hammer will have to be adjusted so that it blends nicely with the body of the shark. First, right-click the layer that contains the hammer and choose Add Mask in the drop-down menu. Then select the Brush Tool (B) and choose a soft circular brush. Then add strokes of black in the layer’s mask, where the hammer intersects with the shark’s body. Use the image below as a reference. This will make some parts of the hammer transparent.

STEP 9
Next, lets make the hammer’s texture appear more skin-like instead of metal. To do that duplicate the layer Hammer, right-click it and choose Create Clipping Mask. Then go to Image>Invert Color. This will change all the colors of the image to exact opposites of the originals. After that, set the Blending to Vivid Light and reduce the Opacity to 40%.

STEP 10
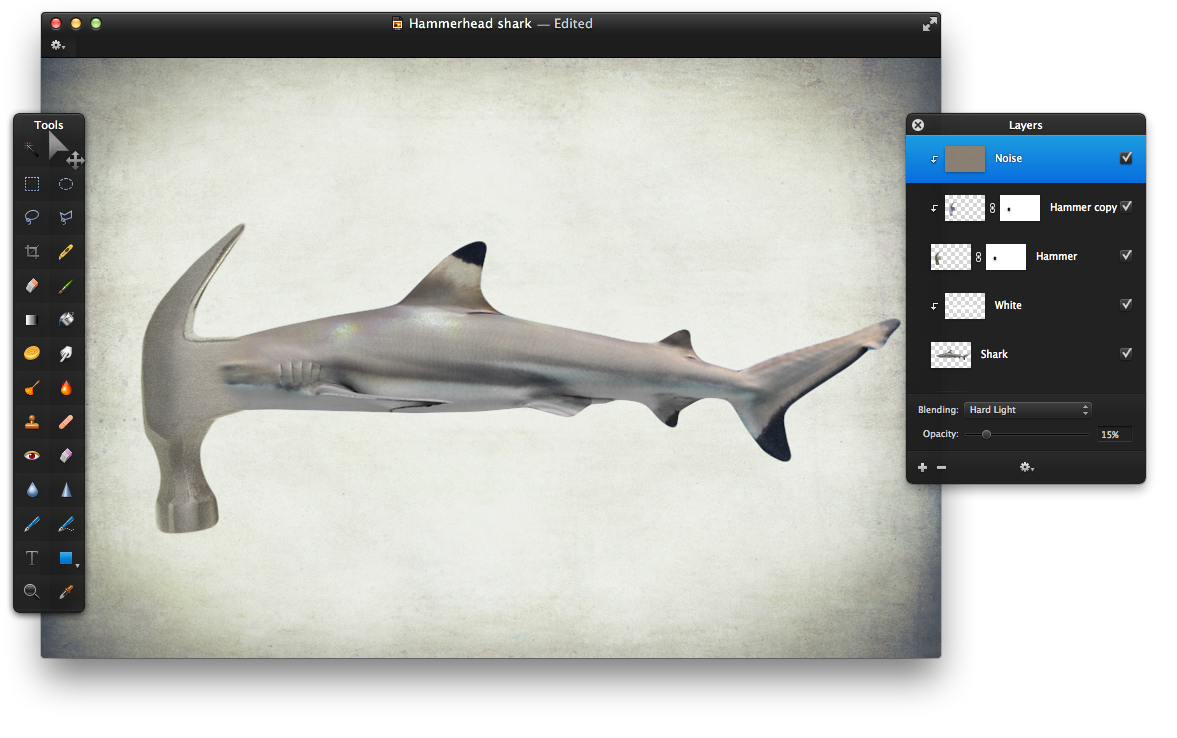
Now, lets add a noise filter to the hammer to make it’s texture even more similar to shark’s skin. Create a new layer, name it Noise and fill it with beige color (color code – #877d75). Then go to Filter>Stylize>Noise, set the Amount to 10% and click OK. Lastly, change the layer’s Blending to Hard Light and reduce the Opacity to 15%.
STEP 11
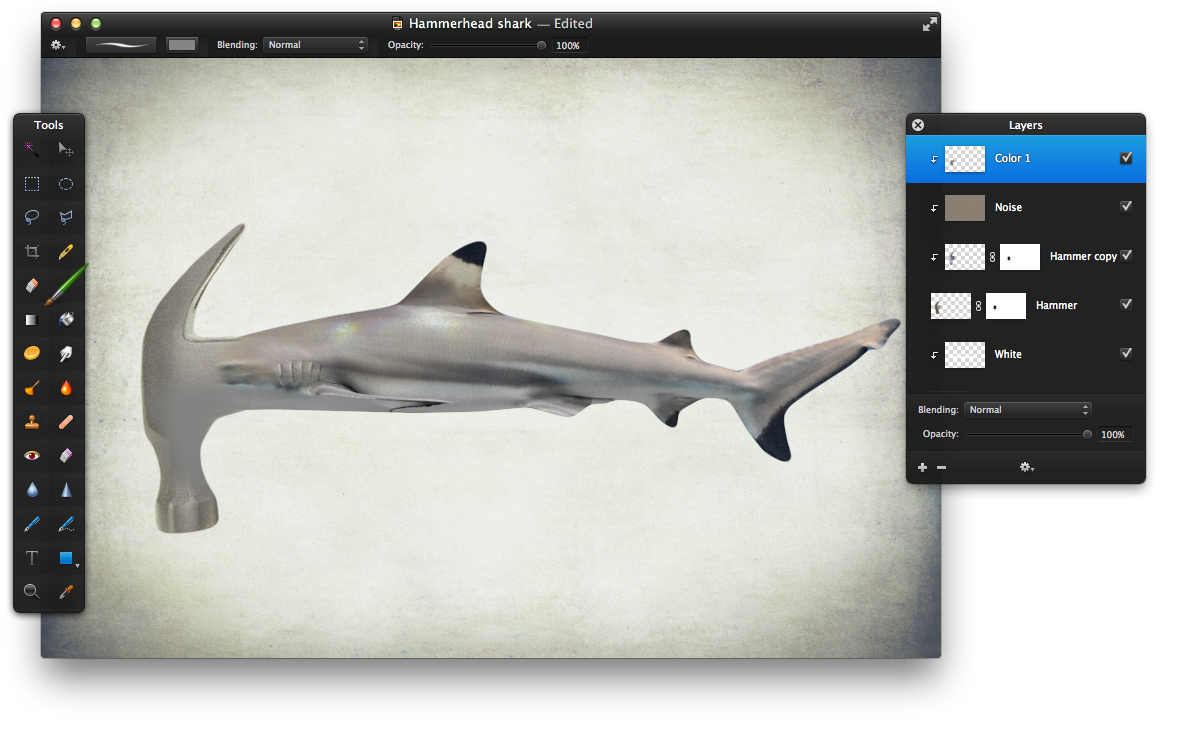
Next, lets alter the colors of the hammer so that it blends in nicely with body of the shark. Create a new layer named Color 1, right-click it and choose Create Clipping Mask. Use a soft round brush to add strokes of dark grey (color code – #606060) where the hammer intersect with the belly of the shark. Use the image below as a reference. Then reduce the layer’s Opacity to 50%.
STEP 12
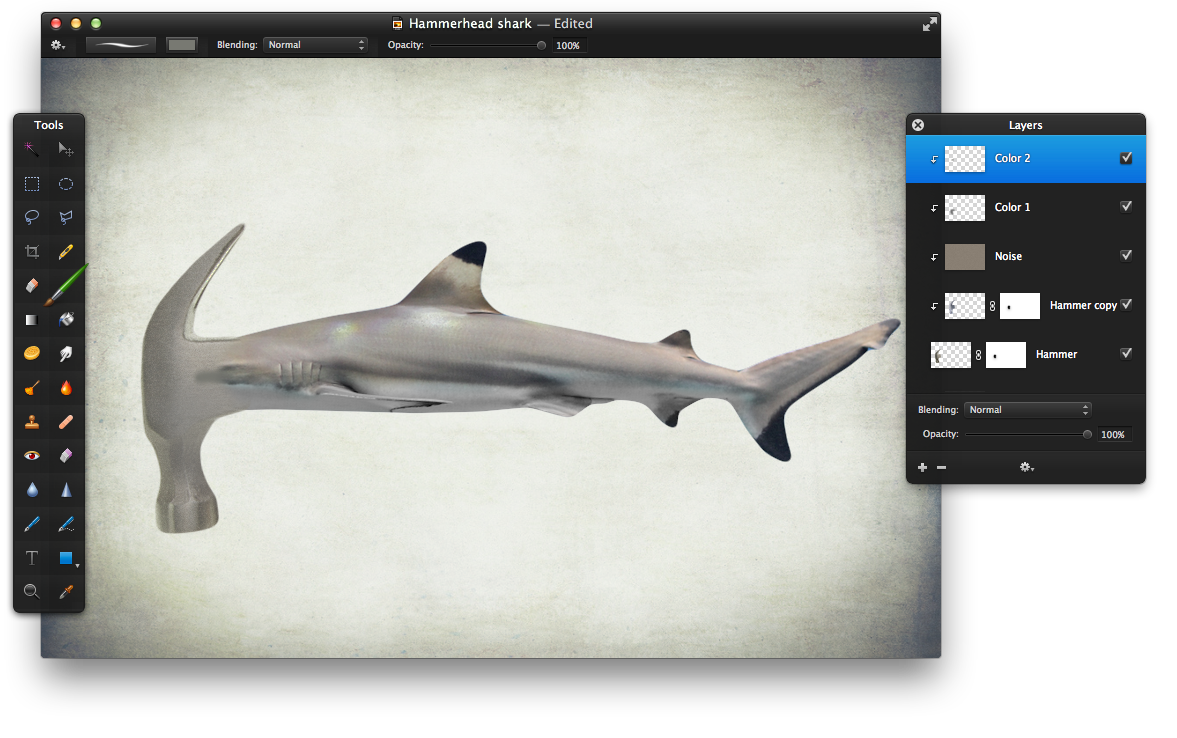
Let’s continue the shark skin’s color pattern on the hammer. Create a new layer and name it Color 2. Right-click the layer and choose Create Clipping Mask in the drop-down menu. Then use a soft rounded brush to add a dark grey stroke in the middle of the hammer, parallel to the shark’s gills. After that go to Filter>Blur>Motion, set the Radius to 10px, the Angle to 0° and click OK. Lastly, set the layer’s Blending to Hard Light and reduce the Opacity to 70%.
STEP 13
Now, lets merge the layers together. Select all the layers that contain images of the shark, the hammer or the effect applied to either of these, right-click them and choose Merge Layers in the drop-down menu. Rename the new layer to Shark.

STEP 14
Duplicate the layer Shark and rename it to Outter glow. Position the new layer below the layer Shark in the Layers Palette. Then go to Image>Colorize, set the Lightness to -100% and click OK. After that, go to Filter>Blur>Gaussian, set Radius to 5px and click OK. Lastly, reduce the layer’s Opacity to 30%.

STEP 15
The image of the shark will stand out more if the shadows are amplified. To reach this effect create a new layer named Black, right-click it and choose Create Clipping Mask. Then use a soft rounded brush to add strokes of black on the lower part of the shark’s body. Use the image below as a reference. Then, reduce the layer’s Opacity to 60%.

STEP 16
Now, lets increase the illumination of the shark. Create a new layer, name it White and make it into a clipping mask (right-click>Create Clipping Mask). Once again use a soft rounded brush to add strokes of white on the body of the shark as in the example below. Then, change the layer’s Blending to Overlay and reduce the Opacity to 70%.

STEP 17
To make the contours of the shark’s new head more distinct create a new layer and name it Black 2. Right-click the layer and choose Create Clipping Mask in the drop-down menu. Then use a soft rounded brush to add strokes on the leftmost part of the shark’s head. Use the image below as a reference. Then reduce the layer’s Opacity to 20%.

STEP 18
As a finishing touch, lets add a soft shadow underneath the shark. Create new layer named Shadow and position it under the layer Outter glow in the Layers Palette. Then use the Elliptical Marquee Tool (Y) to select and elongated circle underneath the shark as in the example below. Use the Paint Bucket Tool (N) to fill the selection with black color. Then go to Filter>Blur>Gaussian, set the Radius to 10px and click OK. Next, go to Filter>Blur>Motion, set the Radius to 20px, the Angle to 0° and click OK. Lastly, reduce the layer’s Opacity to 40%.

CONCLUSION
The Pixelmator software makes it easy to visualize even the most ludicrous ideas in a lifelike fashion. Don’t forget to focus on the details and lighting when bringing your ideas to life.
