
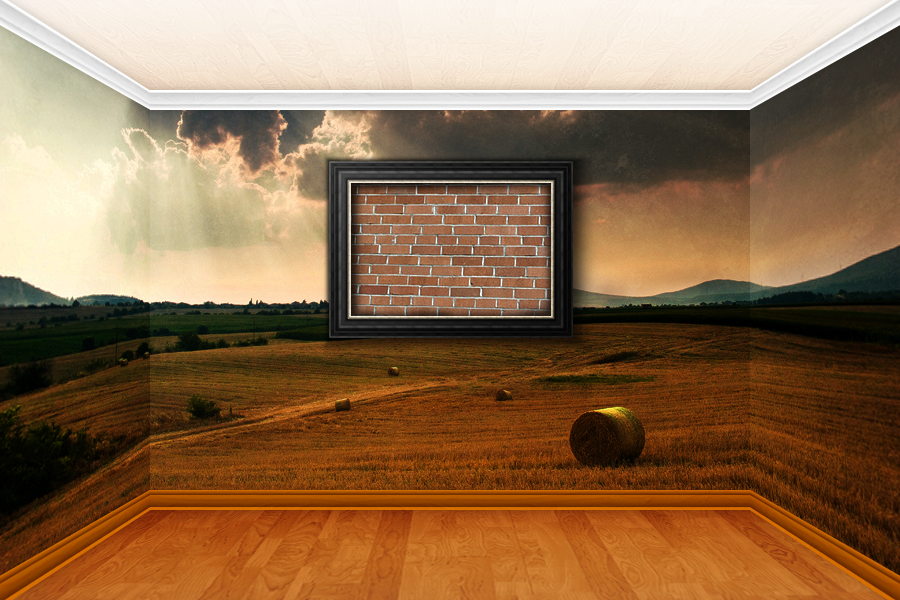
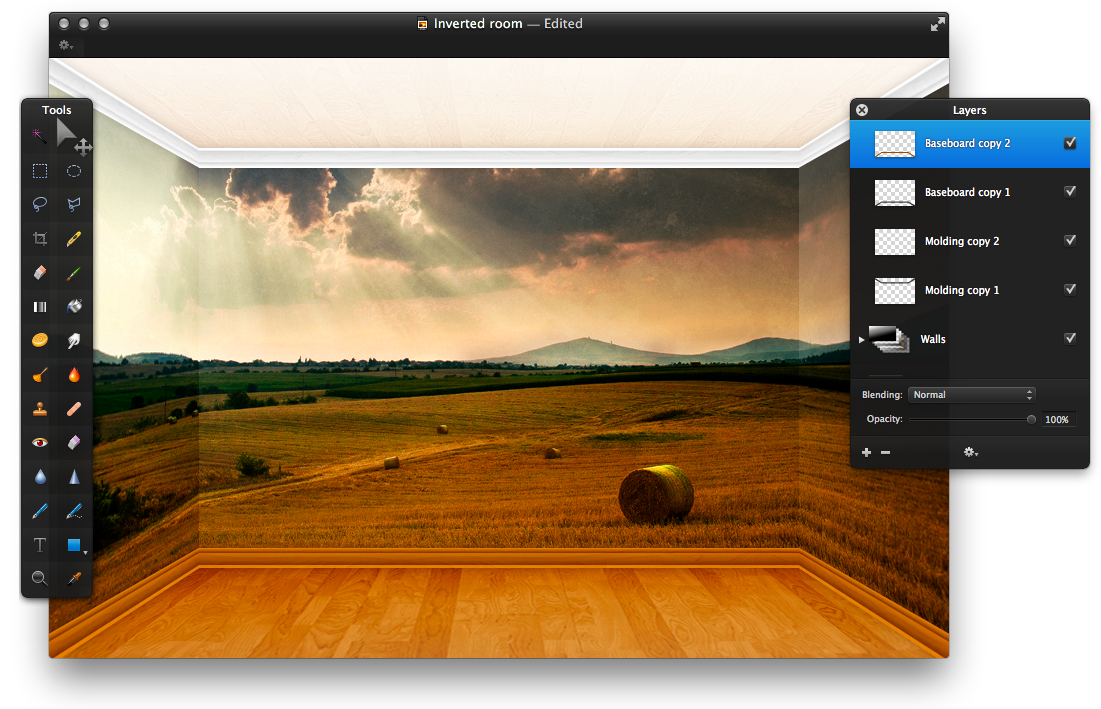
Inverted room
INTRODUCTION
In today’s consuming society it is easy to overlook the simple and beautiful things in life. An ambiguous photo-manipulation can help to highlight some of the controversial choices that we make in our lives. Follow this tutorial to create a room with an unconventional interior decorations.
The Transform Tools, the Gradient Tools, the Filters and other features of Pixelmator are used in this tutorial.
RESOURCES
 PXM File
 Stock photo (Field) by Nick-K (Nikos Koutoulas)
Stock photo (Grungy texture) by Photoshop Roadmap
Stock photo (Floor) by Braddamy
Stock photo (Painting) by glen.dahlman
Stock photo (Brick wall) by AnnaleeBlysse
STEP 1
Open Pixelmator and create a new document. The image size used in this tutorial is 900×600 pixels. First, choose View > Show Grid to make the gridlines visible. This will make positioning and resizing images much easier. Drag and drop the picture of the field and use the Move Tool (V) to position the image so that there are two empty gridlines below the photograph. Then use the Rectangular Marquee Tool (M) to make a selection at the top of canvas that is the same length as the canvas and the height of 2 gridlines. After that, delete the selected part of the image by pressing the Delete key on your keyboard. Use the image below as a reference.

STEP 2
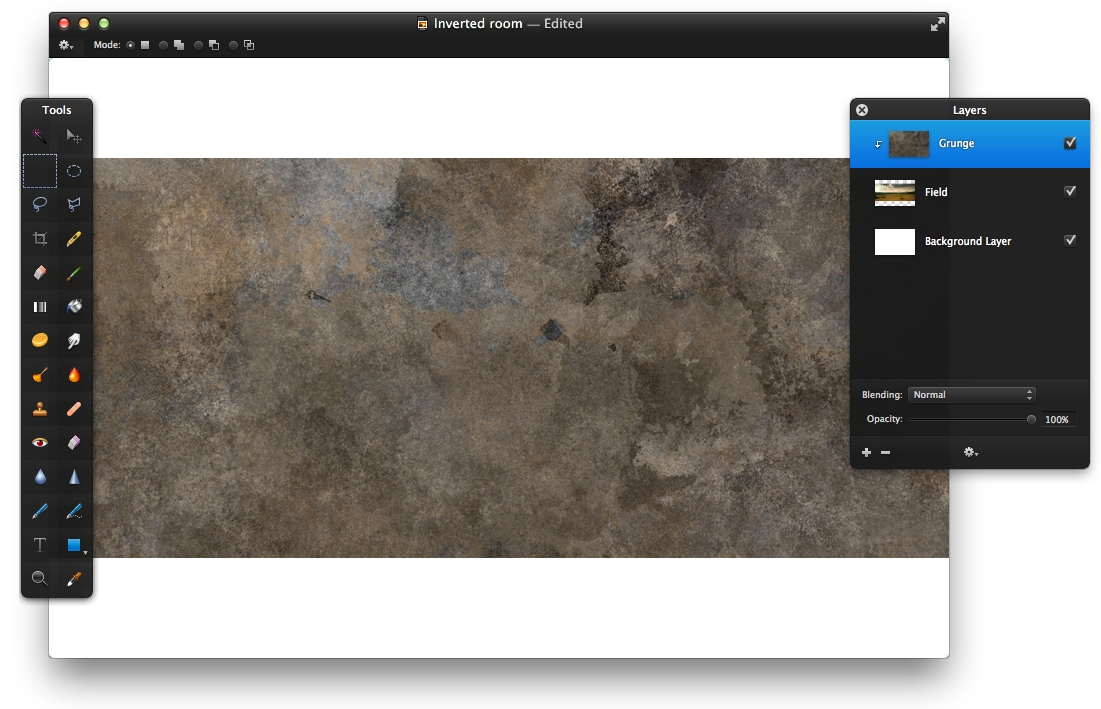
Next, hide the grid (View > Hide Grid) to get a better view of the picture. Now lets make the image look a bit scruffy by applying a grungy texture. Drag the stock image of the texture into a new layer and name it “Grunge”. Right-click the layer “Grunge” and choose Create Clipping Mask. Then set the layer’s Blending to Soft Light and reduce the Opacity to 50%.
STEP 3
Then make the colors of the image a bit warmer. Create a new layer named “Color” and use the Paint Bucket Tool (N) to fill it with cayenne color (color code – #800000). Right-click the new layer and choose Create Clipping Mask in the menu. After that, set the layer’s Blending to Overlay and reduce the Opacity to 20%.

STEP 4
To make the layers more manageable, select the layers “Field”, “Grunge” and “Color” in the Layers Palette, right-click them and choose Merge. Rename the new layer to “Back Wall” and then make the gridlines visible once again (View > Show Grid). After that, use the Rectangular Marquee Tool (M) to make a selection at the left of the canvas. The selection should be the height of the image and the length of 3 gridlines. Use the image below as a reference (In this example the Tools Palette is hidden for a better view. To hide the Tools Palette choose View > Hide Tools). Then Cut (Edit > Cut) and paste the selection into a new layer and name it “Left wall”. Repeat the process on the right side and name the layer “Right wall”.

STEP 5
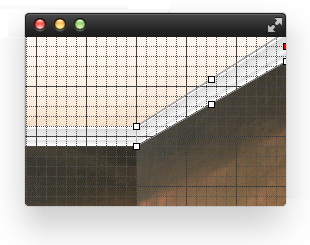
Now lets add perspective to the side walls. First select the layer “Left wall” and choose Edit > Transform. Then click the Action button in Tools Options Bar and choose Perspective in the menu. Drag the upper left corner handle of the bounding box to the top of the canvas. The result should look similar to the example below. Repeat these steps on the layer “Right wall”.

STEP 6
Now create a new layer, name it “Gradient” and position it above the layer “Back wall” in the Layers Palette. Then right-click the layer “Gradient” and choose Create Clipping Mask. Use the Gradient Tool (G) to fill the layer with a black to white gradient as in the example below. Then change the layer’s Blending to Soft Light and reduce the Opacity to 30%. After that, repeat the same steps to add gradients over the layers “Left wall” and “Right wall”. Don’t forget to change the additional gradient layers’ blending and opacity.

STEP 7
To keep the Layers Palette neat and tidy, group set of similar layers. Select all the wall layers in the Layers Palette, right-click them and choose Group. Then name the group “Walls”.

STEP 8
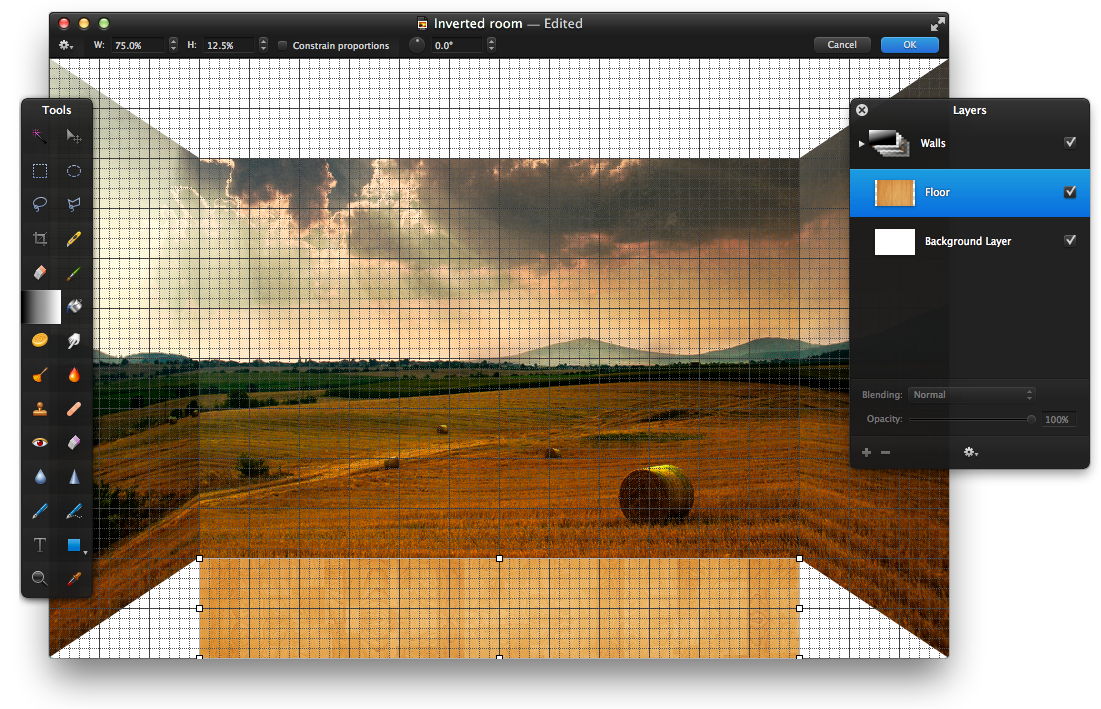
Next, make the gridlines visible (View > Show Grid) and drag the stock image of the floor into a new layer. Name the new layer “Floor” and place it below the group “Walls” in the Layers Palette. Then choose Edit > Transform, deselect Constrain proportions in the Tools Options Bar and resize the image as in the example below. Do not quit the Transform tool and proceed to step 9.
STEP 9
To give the floor some perspective, click the Action button in the Tools Options Bar and choose Perspective in the menu. Then drag the lower left corner handle of the bounding box to the left of the canvas. Use the image below as a reference.

STEP 10
Now lets darken the colors of the floor. Create a new layer and name it “Black”. Place it above the layer “Floor” in the Layers Palette. Then right-click the layer “Black” and choose Create Clipping Mask. Use the Paint Bucket Tool (N) to fill the layer with black color and change it’s Blending to Soft Light.
Next, lets create an impression that the back wall is casting a shadow on the floor boards. Create a new layer named “Gradient” and place above the layer “Black”. Right-click “Gradient” and choose Create Clipping Mask. Then use the Gradient Tool (G) to fill the layer with a black to white gradient as in the example below. Change the layer’s Blending to Soft Light and reduce the Opacity to 40%.
Finally, select all the floor layers (“Floor”, “Black” and “Gradient”), right-click them and choose Group in the menu. Name the new group “Floor”.

STEP 11
Next, lets work on the ceiling. Duplicate the group “Floor” and rename it to “Ceiling”. Position the contents of the group at the top of the canvas by choosing Edit > Flip Vertical. Next, make the texture of the wood more defined. Select the layer “Floor” in the group “Ceiling”, choose Filter > Sharpen > Sharpen, set the Sharpness to 100% and click OK. After that, delete the layer “Black” and replace it with a layer named “White”. Right-click it and choose Create Clipping mask. Then use the Paint Bucket Tool (U) to fill the layer with a white color and decrease the layer’s Opacity to 80%. Lastly, increase the Opacity of the layer “Gradient” to 100%.

STEP 12
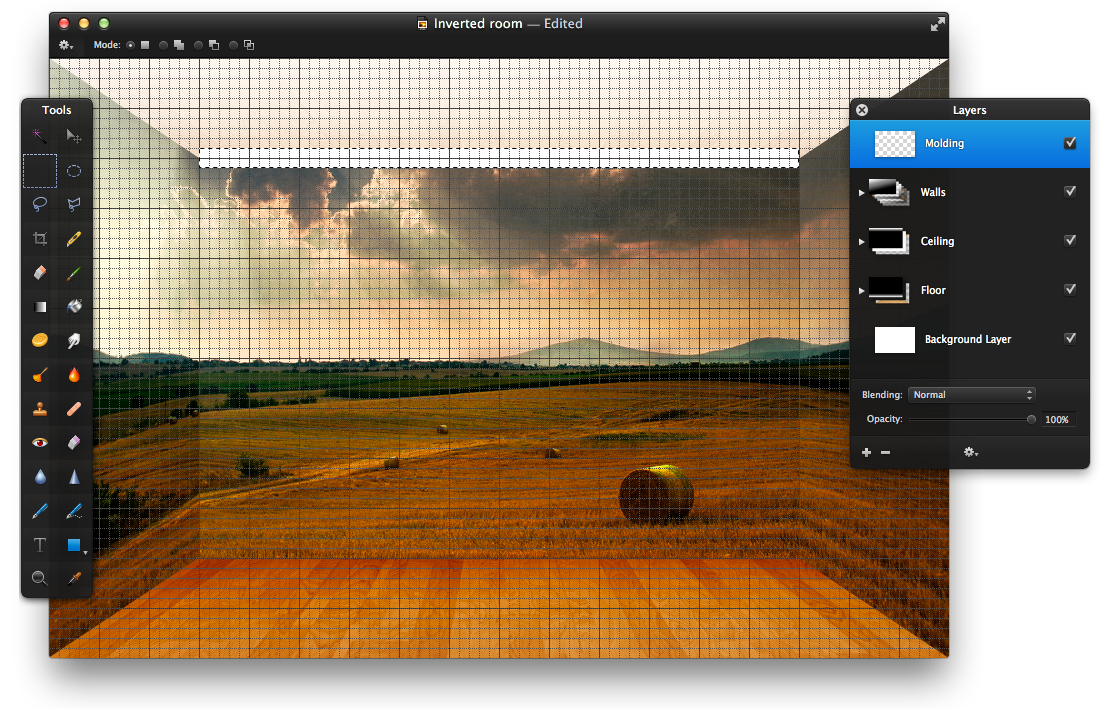
Now create a molding to cover the place where the walls come into contact with the ceiling. First, make the gridlines visible (Show > Gridlines). Then create a new layer named “Molding” and use the Rectangular Marquee Tool (M) to select a line that’s the same length as the back wall and height as 2 subdivisions of a gridline. Use the image below as a reference. After that, choose Edit > Fill, set the Color to white and click OK.
STEP 13
Use the Gradient Tool (G) to add a profile to the molding. First, create a new layer named “Gradient”. Then right-click it and choose Create Clipping Mask in the menu. Fill the layer with a gradient. When applying the gradient make sure that its direction is from top to bottom; consult the tip below if you have trouble creating an appropriate gradient. After that, set the layer’s Opacity to 25%.
Next, drag the image of the wood texture used for the floor into a new layer and name it “Wood”. Then right-click it and choose Create Clipping Mask in the menu. Choose Edit > Rotate 90º Left. After that, make the image monochrome by choosing Image > Desaturate. Lastly change the Blending of the layer “Wood” to Overlay.

Tip: To create a gradient used in step 13, first, open the Gradients Palette (View > Show Gradients). Then click the Action button and choose New Gradient. Click the left color stop to open the Colors Palette. After that, set the left and right color stops to white. Then add 4 additional color stops by clicking four times anywhere on the gradient spectrum. Set their colors as in the example below (white, black, white, black) and position them accordingly.

STEP 14
Now, select all the layers containing elements of the molding (“Molding”, “Gradient”, “Wood”), right-click them and choose Merge in the menu. Rename the new layer to “Molding”. To start working on the side moldings duplicate the original layer and give it some perspective as in the example below. Consult the tip for further instructions on adding perspective. After that, duplicate the side molding, flip it horizontally (Edit > Flip Horizontal) and move it to the left of the canvas.

Tip: To create a side molding, first, select the duplicate of the original molding. Then choose Edit > Transform and deselect the Constrain proportions option in the Tools Options Bar. After that, resize the duplicate so that it’s width would be the same as the right wall’s and keep the height of the molding unchanged. Use the image below as a reference. Do not exit the Transform Tool and continue with the instructions.

Next, click the Action button in the Tools Options Bar and choose Perspective. Drag the upper right corner handle of the bounding box to the top, until the side molding appears to be in perspective as in the example below.

Lastly, drag the middle right handle of the bounding box (highlighted in red in the example underneath) to the top of the canvas until it’s aligned with the right wall. The final result should look similar to the image below.
STEP 15
Now lets make the molding cast a shadow on the walls. Merge all the layers of the molding. Then duplicate the new layer, choose Image > Colorize and reduce the Lightness to -100%. After that, choose Filter > Blur > Gaussian, set the Radius to 5 px and click OK. Reduce this layer’s Opacity to 20% and move it underneath the original molding layer in the Layers Palette.

STEP 16
Next, lets start working on the baseboard. Make the gridlines visible once again (View > Show Grid) and create a new layer named “Baseboard”. Then use the Rectangular Marquee Tool (M) to make a selection such as in step 12, only this time position it where the walls come into contact with the floor. Use the image below as a reference on positioning. Then choose Edit > Fill, set the color to mocha (color code – #804000) and click OK.
Next, add a profile to the baseboard. Create a new layer named “Gradient”, right-click it and choose Create Clipping Mask in the menu. Then fill the layer with the gradient used in step 13, only this time make its direction is from bottom to top as in the example below. Lastly, change this layer’s Blending to Overlay and reduce it’s Opacity to 50%.

STEP 17
Now lets add some texture to the baseboard. Once again drag the image of the wood texture used for the floor into a new layer, rename it to “Wood” and rotate it by 90º (Edit > Rotate 90º Left). Then right-click the layer “Wood” and choose Create Clipping Mask in the menu. Next, select all the layers containing parts of the baseboard (“Baseboard”, “Gradient”, “Wood”), right-click them and choose Merge. Then duplicate the new layer twice and resize it as in step 14, only this time make sure that the side baseboards are facing downwards. Use the image below as a reference on resizing.
Lastly, lets add a shadow underneath the baseboard. Select all three layers containing parts of the baseboard, right-click them and choose Merge. Then duplicate the new layer and position it below the original layer in the Layer’s Palette. Next, choose Image > Colorize, reduce the Lightness to -100% and click OK. After that, choose Filter > Blur > Gaussian, set the Radius to 5 px and click OK. Lastly, reduce the Opacity of the layer to 20%.
STEP 18
Next, start working on the painting. Drag and drop the stock photo of the painting and reduce it’s size to 25% by choosing Edit > Transform. Next, use the Rectangular Marquee Tool (M) to select the white background around the painting and delete it by pressing the Delete key on your keyboard. The final result should look similar to the image below.

STEP 19
Now use the Rectangular Marquee Tool (M) to make a selection over the painting inside the frame. Then create a new layer name “Black”, choose Edit > Fill, set the Color to black and click OK. This layer will serve as a base for the new modified painting.

STEP 20
Drag and drop the stock photograph of the brick wall and name the new layer “Wall”. Then right-click it and choose Create Clipping Mask. After that, choose Edit > Transform, reduce the size of the selection to 35% and use the Move Tool (V) to position the image as in the example below.
Next, enhance the colors of the image. Choose Image > Brightness and Contrast, set the Contrast to 10% and click OK. After that, choose Image > Shadows and Highlights, set both the Lighten Shadows and Darken Highlights to 100% and click OK.

STEP 21
To make the frame of the painting cast a shadow on the bricks, first, create a new layer named “Shadow”. Then right-click the layer and choose Create Clipping Mask. Select the Brush Tool (B) and and use a soft rounded brush to add strokes of black around the outline of the painting. Use the image below as a reference. After that, reduce the layer’s Opacity to 70%.

STEP 22
Next, add a lighting effect to the frame. Create a new layer named “Gradient” and position it above the layer “Painting” in the Layers Palette. Right-click the layer “Gradient” and choose Create Clipping Mask. Then use the Gradient Tool (G) to fill the layer with a black to white gradient as in the example below. After that, change the layer’s Blending to Soft Light and reduce the Opacity to 70%.

STEP 23
As a finishing touch, add a shadow under the frame of the painting. First, duplicate the layer “Painting” and name it “Shadow”. Then position it underneath the layer “Painting” in the Layers Palette. After that, choose Image > Colorize, reduce the Lightness to -100% and click OK. Next, choose Filter > Blur > Zoom, set the Amount to 5 px, use the rope to set the center of the filter near the top left corner as in the example below and click OK. Lastly, reduce the Opacity of the layer “Shadow” to 70%.

CONCLUSION
When doing photo-manipulations of common objects, remember that even the smallest detail may have a big impact on how genuine the final product looks. A well placed shadow or a correct positioning of the light source may be the finishing touch that gives an image the real-life look.
